The projects installed with Smile
If you installed Smile, full version, the folder /Application/Smile/Documentation/fr/readme/ contains a file named Sample projects Xcode - Read-me.rtf which describes the sample Xcode projects. The file is also online at Sample projects Xcode - Read-me
Smile's Installer creates or updates some project templates, and a folder named Satimage includes, that all projects use. All files are installed in /Library/Application Support/Apple/Developer Tools/Project Templates/Satimage Sample Projects/.
A project template is a model available when you select File ▸ New Project in Xcode.
You can find sample projects in the /Applications/Smile/ folder.
Each project is to make scriptable an existing C or FORTRAN program. You do not have to bring changes to your original files, but rather you will have new source files handle the communication with AppleScript.
To use the projects you must have installed Developer Tools, including Xcode 2.2 or higher.
The four following sample projects are installed.
- SampleOsax is a template installed with Smile, and it is also provided with the sample projects. This project is for making your code into a scriptable application or into a Scripting Addition (or osax), a stand-alone plug-in for AppleScript that you can call directly from Smile or from any script. The source code provided with the sample shows how to handle the two data structures in order to communicate smoothly with Smile: array of real and matrix.
- SampleApp is a template installed with Smile, and it is also provided with the sample projects. This project is for making a scriptable application based on a C or C++ program. With a scriptable application you control your code from Smile while it is running. Your code lives independently of the environment, you can re-compile it at any moment without restarting Smile.
- SampleAppFortran77 is for making a scriptable application based on a FORTRAN program.
- ThreadedApp is for making a scriptable application which will run your computational code in a separate thread. This is how you can have a script suspend, resume, and monitor in real-time the execution of the computational code.
Starting a new project
In Xcode, select File ▸ New Project in the menu. In the list, select the SampleOsax project or the SampleApp project in the category named Satimage Sample Projects. You are asked to provide a new name and location for your project.
Please note: if the project's file path includes a space, you may experience problems when compiling it.
Please note: if you use the projects as samples but not as templates for a new Xcode project, you may have to specify the location for the folder named Satimage includes. By default, that folder is in /Library/Application Support/Apple/Developer Tools/Project Templates/Satimage Sample Projects/.
Contents of the project
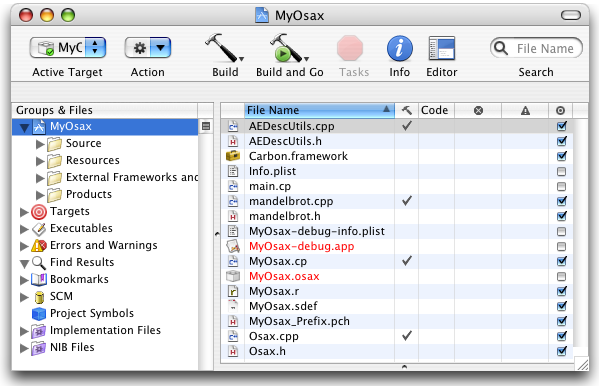
At first your project should look like below.

First of all, launch a first Build of the project, in order to make sure that the project is valid as such - before you change it. Build each target if the project has more than one (the SampleOsax project defines two targets, «ProjectName» and «ProjectName»-debug). You can select the build's target in the menu located in the left of the project's main window's toolbar.
Some files and some targets are renamed during the creation of a new project. In this documentation, «ProjectName» refers to the name of your new project.
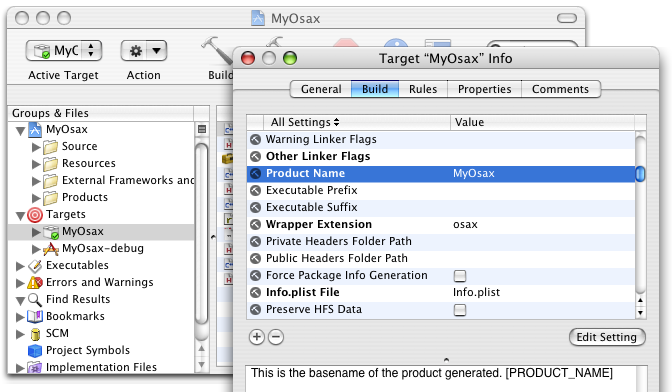
When you expand the Targets triangle, you can display the information about a given target (File > Get Info menu). You can rename the target in the General tab, and the product's name in the Build tab.
Please note: if you change the Product Name in the Build tab, you must provide the same name for the Executable field in the Properties tab. Otherwise the product may not be launchable.

Now you may want to rename some files in the project. Do not rename the files in Finder. Rather, use the File > Rename menu in Xcode, otherwise the project will not update the location of your files, and it will print their names in red in the sources list.
For some files, changing their name implies additional changes.
- the name of the file «ProjectName»_Prefix.pch is declared as the Prefix Header parameter in the Build's options. If you rename the file, update that parameter.
- the file «ProjectName».sdef produces «ProjectName».r. If you rename «ProjectName».sdef, rename «ProjectName».r accordingly. A specific script makes that file in the Resources folder before the link.
Once those changes made, launch a Build, in order to detect any error as early as possible.
Including your source files
All you have to do for finalizing your project is to replace the example's source files with yours. In the osax template project, the sources are the files Mandelbrot.cp and Mandelbrot.h.
To remove files from a project, use the Edit > Delete menu. To add files to the project, drag a folder or files from Finder to the project's sources list.
You may want to comment out the calls to the example sources, to check that the project compiles correctly, before going ahead. The calls to remove are in the file «ProjectName».cp in osax projects, or in the file main.cp in scriptable application projects.
Before launching a Build, perform a Clean in order to delete the object files related to the files that you have removed.
|

